Monday 6 March 2017

HANA XS: Javascript - Outbound API's ($.net)

SAP HANA XS outbound API($..net) provides tools that you can use to perform the below action.

  1. $.net.SMTPConnection.
    for sending $.net.Mail objects by means of an SMTP Connection.
  2. $.net.Mail
    For constructing and sending multipart of emails.
  3. $.net.http
    HTTP(s) client classes for outbound connectivity and an HTTP(s) destination class that hold metadata.
Example of $.net.http  API.
  1.  Create Hana destination file - myDestination.xshttpdest file.
    An HTTP destination defines connection details for services running on specific hosts whose     details  you want to define and distribute.The definition can be referenced by an application.


  2. Create JavaScript file - OutboundAPI.xsjs.


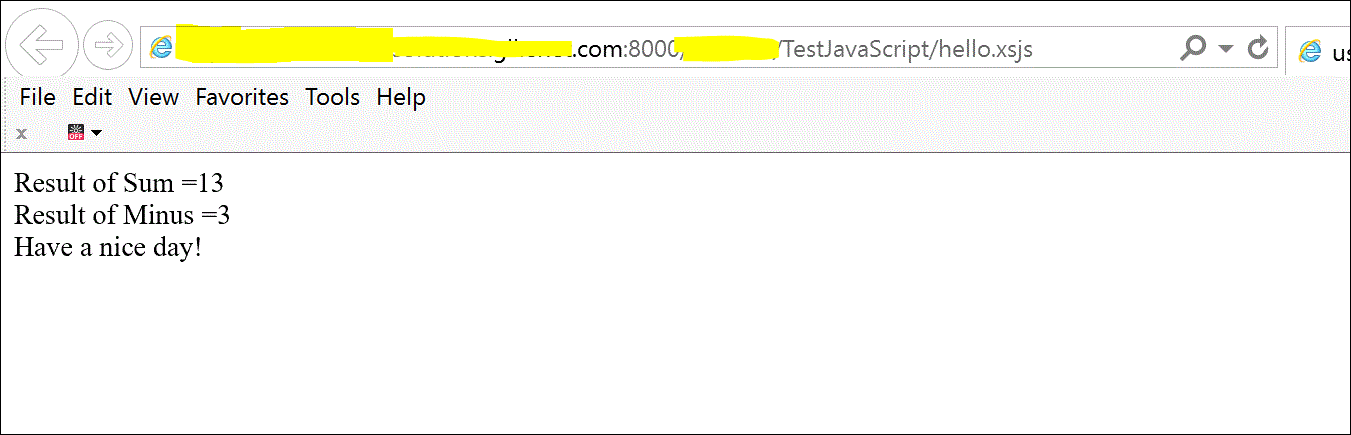
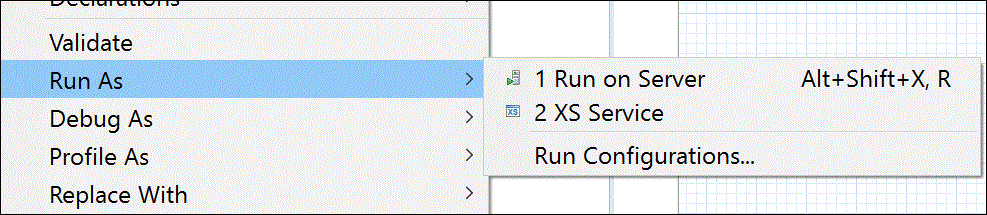
  3. Run you .xsjs file via Run As XS service and you should get below output.


Monday 27 February 2017

HANA XS: Javascript -Database API's ($.db)

SAP HANA XS Database API($.db) provides tools that enable simple and convenient access to database.
  1.  $.db.getConnection().
    It returns $.internal.api.Connection object which has below method.
    1. close()
      closes the connection.
    2. commit()
      commits the connection.
    3. isClosed()
      Checks if connection is closed or not.
    4. prepareCall()
      Prepares a stored procedure for execution.
      Returns $.internal.api.CallableStatement object.
    5. prepareStatement(statement)
      Prepares a statement fro execution.
      Returns $.internal.api.PreparedStatement object and following methods.
      1. executeQuery()
        Executes an SQL statement and returns $.internal.api.ResultSet object and has below methods.
        1. getString(column Index).
          Return String for a specified columns.
        2. next()
          Iterates to next row of result set.
      2. executeUpdate()
        execute the update statement and returns the number of changed rows.
    6. rollback()
      Rolls back the changes.
    7. setAutoCommit()
      Changes the auto commit flag of the connection.
  2. Example:

    1. Create below table by writing below SQL on console.
    2. Write following code in javascript file to access the table's data by using database API.
    3. Run the .xsjs file as HANA XS service.


Wednesday 22 February 2017

HANA XS: Write Server Side Java Script

How to Write Java Script Libraries?
  1. Click here to learn more about libraries.
  2. Open SAP HANA Development Perspective -->Project Explorer tab.
  3. Server Side Java Script libraries have an extension .xsjslib.
  4. To create a new file, select
    New-->Other-->SAP HANA-->Application Development-->XS JavaScript Library File.

  5. Select the parent folder and Name of file (eg. Custom_library.xsjslib).
    Note: Please create this file in other package apart from your project's package to test it out the $import function.

  6. Enter the following content in custom_library.xsjslib file.

  7. Import this library into your javascript file (hello.xsjs).
    Use $.import to reference library file to .xsjs file

  8. Activate it and Run that application as Run AS --> XS Service.


HANA XS: All About Java Script Libraries.

HANA Server side libraries are special type of Java Script program that can be imported and called in JavaScript program to perform simple and repetitive tasks.
Basic points about Server side libraries.

  1. The libraries exist in the context of package, which is referenced when you import a package.
  2. The libraries are imported by using function import of XS Java Script API.
    Syntax: import(path,library).
  3. The Import operation generates a hierarchy of objects below $ that resembles the libraries location in the repository.
    for example- if library name is Test located at path new/testpackage having function sum(),minus()
    Then it will generate following object.
    $new.testpackage.Test
    Additional properties for newly generated libraries object.
    $new.testpackage.Test.sum()
    $new.testpackage.Test.minus()
  4. Do not import the referenced libraries if it is already defined in the package.
    For example:
    Pre-defined libraries which gets included when create a project.
  5. How to write Custom Server side libraries.


HANA XS : Write Server Side Java Script.

SAP HANA XS supports server side application programming in JavaScript. The server-side application you develop used JavaScript API's to expose authorized data to client request.

In order to write server-side Java Script application, you must perform the following below steps:
  1. Setup a new project for application.
    Click here to set up a new project
  2. Create application descriptor file.
    Click here to create (.xsapp) file
  3. Create application access file.
    Click here to create (.xsaccess) file
  4. Create server-side JavaScript files that contains application logic.
    1. Select Project Explorer tab.
    2. Select New ---> Other--> SAP HANA--> Application development--> XS Java Script File.
    3. Write below Code in XS Java Script file and activate it.


    4. Right click on Java Script file and select Run As --XS application to preview output in Browser.
    5. Data preview on browser.


Sunday 19 February 2017

HANA XS : Why JavaScript.

Why we need JavaScript for XS application?

  1. Its a language that can be used by application developer to create native SAP HANA applications that expose data to UI clients on request.
  2. Its is used for writing business logic that is used for exposing data to clients requests via HTTP.
  3. Prerequisites for using JavaScript.
    1. You must have access to SAP HANA system.
    2. You must have already created a development workspace and project.
      Click here to setup a project:
    3. You must have shared a project for the XS JavaScript artifacts so that the newly created files can be committed to the repository.
      Click here to learn how to share project:
Basic HANA XS application requires three people:
  1. Database developers.
    1. Language require:
      1. SQL Script.
      2. CDS
  2. Application developer.
    1. Language require:
      1. XS Java Script.
      2. OData.
      3. SQL Script.
  3. UI/Client developer.
    1. Language require:
      1. SAP UI5
      2. Java Script.

Saturday 18 February 2017

SAP HANA XS: Application Privileges file (.xsprivileges)

Application Privileges file (.xsprivileges)
  1. This file enables you to define the authorization levels required for access to an application.
  2. This privileges can be assigned to individual role or users.
  3. The .xsprivileges file must reside in the same application package that you want to define access privileges for.
  4. And you must also add a corresponding entry in the same application’s .xsaccess file.
    For example: Using the authorization keyword.
  5. The application privileges file does not have a name; it has only file extension .xsprivileges.
    The content of the .xsprivileges file must be formatted according to the JavaScript Object Notion (JSON) rule.
  6. Multiple .xsprivileges files are allowed but only at different levels in the package hierarchy.
    You can’t define two .xsprivileges files in the same application package.
  7. The privilege name is unique to the package to which it belongs and, as a result, can be used in multiple .xsprivileges files in different packages.
  8. After activation of .xsprivileges object, the only user who by default has the application privileges specified in the .xsprivileges file is the _SYS_REPO user.
    1. To grant application privileges to other user, use the procedure or _SYS_REPO.
      GRANT_APPLICAITON_PRIVILEGES.
      REVOKE_APPLICATION_PRIVILEGES.

  9. How to create it ?
    1. Open SAP HANA Studio.
    2. Open SAP HANA development Perspective.
    3. In the Project Explorer tab, right click on the folder where you want to create it.
    4. In context menu,
      NewàOtheràSAP HANAàApplication DevelopmentàXS Application Privileges file.
    5. Finish it.
    6. Now open the .xsprivileges file from project and edit it and activate it.


  10. Example:


        Suppose this file is located in package com.test then the following privileges will be created.
        com.test::Execute
        com.test::Admin
  11. After activation of .xsprivileges object, the only user who by default has the application privileges specified in the .xsprivileges file is the _SYS_REPO user.

    To grant application privileges to other user, use the procedure or _SYS_REPO.
    GRANT_APPLICAITON_PRIVILEGES.
    REVOKE_APPLICATION_PRIVILEGES.

  12. Also,You need to create an entry of these privileges in .xsaccess file also by using keyword authorization.


SAP HANA XS: Application access file (.xsaccess)

Application access file.
  1. The application access file is JSON compliant file.
  2. It’s basically used for:
    1. To specify if the authentication is required to enable access to package content, which data is exposed.
    2. If rewrite rules are in place to hide target and source URLs.
    3. You can also specify if any level of authorization is required for the package and whether SSL is mandatory for client connections.
  3. How to create it?
    1. Open SAP HANA Studio.
    2. Open SAP HANA development Perspective.
    3. In the Project Explorer tab, right click on the folder where you want to create it.
    4. In context menu,
      NewàOtheràSAP HANAàApplication DevelopmentàXS Application Access file.

    5. Finish it.
    6. Now open the .xsaccess file from project and edit it.


  4. How to create define access in .xsacess file.
    1. A basic .xsaccess file must, at the very least contain a set of curly bracket.
    2. The setting specified in an .xsaccess file apply not only to the package which contains .xsaccess file but also apply to sub-packages also.
    3. Multiple .xsaccess files are allowed but at different package hierarchy.
    4. You can’t put two .xsaccess file in the same package.
    5. Package without a dedicated .xsaccess file inherit the application-access setting defined in the parent folder.
    6. The .xsaccess file uses keyword-value pair to set access rules, if mandatory keyword-value pair is not set then the default value is assumed.
    7. Following keywords are used;
      1. To enable application to access the data by HTTP to client request.

        “exposed” : true     (default – false)

      2. To protect your application against the attack that uses cross-site request forgery (XSRF) vector.

        “prevent_xsrf” : true
      3. To define the application authentication method.

        “authentication” : { “method”: “Form”}
      4. To specify if application privileges is required to a particular package. (optional)

        “authorization”:
               [ “com.test::Execute”,
                 “com.test::Admin”
               ]

        Note: If you use authorization keyword in the .xsaccess file then you must also create .xsprivileges file for the same application package or parent package.
      5. The anonymous_connection keyword enables you to define the name of the .xssqlcc file that will be used for SQL access where no user credential is required.

        "anonymous_connection" : "com.test::registration"
      6. With default_connection keyword, the specified SQL connection configuration (defined in .xssqlcc) is used for all SQL execution in the package.

        "default_connection":"com.test::registration"

        Note:
        The difference between anonymous_connection and default_connection is that the anonymous_connection is only used if the requesting user is not authenticated.
      7. To override the cache-control header for web content served by SAP HANA XS Web Server.

        "cache-control" :"no-store"
      8. To override the default setting for the application access(index.html) when the package is accessed without providing a file in the URI.

        "default_file" : "new_index.html"
      9. To hide the details of internal URL path from external users, clients, and search engine.
        URL re-write rules are written in source-target pair where the source is written in the java script regex syntax and the target is a simple string where reference to found group can be inserted using $groupnumber.


        "rewrite_rules"
         [  {
              "source" : "go/zyd/dfdfd",
              "target":  "/test/new.xsjs"
        }]
      10. To refuse the web-browser requests that do not use secure HTTP(SSL/HTTPS) for client connection.

        "force_ssl" : true


SAP HANA XS: How to create application descriptor file (.xsapp)

Application Descriptor file:
  1. It’s the core file that use to indicate an application’s availability within SAP HANA XS.
  2. It marks the point in the package hierarchy at which an application’s content is available to clients.
  3. It has no content and no name.
  4. It has the file extension .xsapp.
  5. The package that contains the application descriptor file becomes the root path of the resource exposed by application you develop.
  6. How to create it?
    1. Open SAP HANA Studio.
    2. Open SAP HANA development Perspective.
    3. In the Project Explorer tab, right click on the folder where you want to create it.
    4. In context menu,
      NewàOtheràSAP HANAàApplication DevelopmentàXS Application Descriptor file.

    5. Finish it.
    6. Save and activate the changes.
      Team then Activate.
    7. It will reflect under your project as shown below.


SAP HANA XS: Application Descriptor files for XS applications.

Application Descriptor File.

  1. It describes the framework in which an HANA XS application runs.It includes the root point in the package hierarchy where the content is to be served to client requests, and who has access to the content.
  2. Maintaining Application descriptors involve following tasks:
    1. Create an application descriptor file (.xsapp)
      Click here for more details
    2. Create an application access file (.xsaccess)
      Click here for more details
    3. Crate an application privilege file (.xsprivileges)
      Click here for more details


HANA XS Project -Maintaining HANA Repository packages

Why to maintain Packages?
  1.  It enables you to group together the artifacts you create and maintain for your application.
  2. A proper hierarchy of packages helps you to set package privileges for a specific user or role.

Basic actions as a part of Package Maintenance:
  1. Define Package Hierarchy.
    1.  Package belonging to an application development delivery unit (DU) should be organized in a clear hierarchical structure under single root package representing the vendor.
    2.  How to create it?
      1. Open SAP HANA DEVELOPMENT perspective.
      2. Choose System tab.
      3. Select Package under which you want to create new package.
        NEWàPACKAGE.
      4. In the Create Package Dialog:
        1. Enter the Name of Package (Mandatory).
        2. Enter Package Description (Optional).
        3. Specify the delivery unit that the package is assigned to (Optional).
        4. Specify a language for the package content.
        5. Assign responsibility of the package to a specific user or role.
        6. Maintain translation details.
    3. Type of Packages:
      1. Structural:
        Can contain only sub-packages.
      2. Non-Structural.
        Can contain sub-packages and objects.
  2. Default package delivered by SAP.
    1. sap
      it’s a transportable package reserved by for content delivered by SAP.
      Partners or customer must not use the sap package.
    2. system-local
      Non-transportable, structural package (and sub package).
      Content in this package is local and non-transportable.
    3. system-local.generated.
      Non-transportable, structural package for generated content.
    4. System-local.private.<user_name>
      Non transportable, structural package reserved for object that belongs to individual users.

Tuesday 7 February 2017

HANA XS Project - How to Import a Project from HANA Repository

Why to import a project from HANA Repository?
  1. To start working on already existing project.
  2. It enables you to synchronize the local changes with the colleagues working on the objects in the imported project.
How to import a project?
  1. Open SAP HANA Studio.
  2. Open SAP HANA Development Perspective.
  3. Open Repository tab.
  4. Right Click on Package where the project is located
    and select Checkout and Import Project in the context menu.


    Note: The package which will contain project will have .project file.

  5. Select the Project to import.
  6. Select Finish.


HANA XS Project - How to Share a Project to HANA Repository

How to Share an HANA XS Project?

  1. When you share your Project, you set up a connection to the SAP HANA repository associated with a particular SAP HANA Instance.
  2. It ensure that the changes you make to project related files are visible to other team members and applications.
    Other Developer can import a shared project and work on the same files.
  3. To share a project.
    1. Open SAP HANA Studio.
    2. Open SAP HANA development Perspective.
    3. Open Project explorer tab.
    4. Right Click on Project -->Team-->Share Project.


    5. Share Project Dialog- select SAP HANA Repository for sharing.
    6. Select the package that you want associate the shared project with.
    7. Click Finish.
    8. Now, you can add project related files to the shared repository.
      These artifacts will be committed to the repository, where they reside as inactive objects until they are activated.
      To activate them, use Team -->Activate.

HANA XS:Setup a Project For SAP HANA XS.

Why we create a Project ?

  1. To group together all the artifacts you need for an application.
  2. For Version Management, sharing, and maintenance of resources.
How to create a Project?
  1. Open a SAP HANA Studio.
  2. Open a SAP HANA Development perspective.
  3. Choose Project Explorer.
  4. File -->New-->Project
    In New Project Wizard, select
    SAP HANA -->Application Development-->XS Project
  5. Enter Following Details.
    1. Shared Project.
      This is default setting.
      This will ensure continuous synchronization between your local workspace and HANA repository.
      If you choose not to share project then you share it later manually.
    2. Project Name.
      Provide the project Name.
      Since your project name should be unique therefore provide the complete path of packages where you want to save your project in HANA DB.
      For example.
      com.company.example.MyHanaXsProject

      Where com.company.example are the hierarchy of package in main HANA DB.
    3. Project Location.
      If the project is not shared then you can save it in default location.
      and can share it manually later.
    4. Working set.
      It contains the object that you work on most frequently.
    5. Repository workspace and package.
      For a shared project, you can set the project location by selecting a repository workspace and package.
      see, how to create repository workspace?

    6. Common Objects.
      For a shared project, you can include some commonly used objects in your project.
      Some of these will provide you with a basic template to begin with.
    7. Access Objects.
      For Shared Project, the access objects (.xsaccess, .xsapp) option is already checked out.

Maintain A Repository Workspace

What is a Repository in SAP HANA?
Its a local directory that you map to all (or part) of a Package Hierarchy in SAP HANA.

What happens when you check out a package from a Repository?
It copies the content of the package hierarchy to you work-space, where you can work on the files.

How to create Repository?
  1. Open SAP HANA Studio.
  2. Open SAP HANA Development Perspective.
  3. Choose Repository View.
  4. Choose Create Repository Workspace.
    1. Specify the SAP HANA system name for which you want to create a new workspace.
    2. Enter Workspace Name.
    3. Specify where the workspace root directory should be located on your local file system.
       
    4. Finish.
  5. Status of Workspace.
    1. Yellow Database Icon:
      An Inactive workspace exist in repository.
    2. Yellow Database Icon with blue check mark.
      An Inactive workspace has been imported to your local file system and the content has been checked out from the repository.
  6. Remove the Workspace.
    1. Select the Workspace which you want to remove.
    2. Choose the below Workspace-deletion mode.
      1. Delete
        Delete all local files and related changes to remote data.
      2. Remove from client (keep remove changes).
        Delete all local files and retain changes to remote data.
      3. Disconnect local from remote.
        Keep the workspaces but remove the workspace level from the list of workspaces displayed in repository view.
        Connection can be re-established at any time with the option
        "Import Local Repository Workspaces".